When the school notebook says 'Size not proper', show your child exactly what to change
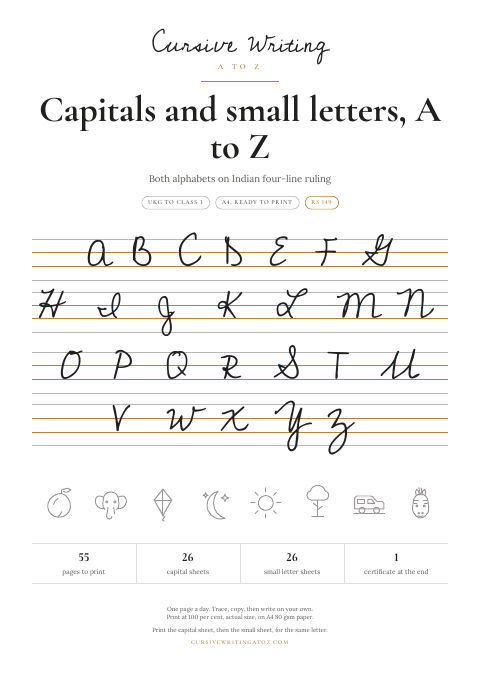
Cursive Writing A to Z is an Indian school handwriting system that teaches capital letters, small letters, and joining on four-line copy, for kids in UKG to Class 3.

Get the A to Z book, Rs 149One A4 sheet for every letter, on the ruling in your child's school copy. Ordered on a form, paid by UPI, emailed to you. Ask for the free capitals A to H pack first if you want to see a sheet used tonight.
"Letters not on the line."
"Size not proper."
The red remark is only a few words. Working out what to do about it can take your whole evening.
You have bought the four-line notebook. You have shown your child the letter. You have said, "Slowly, beta. See properly and write."
Still, the small a becomes almost as tall as the capital A. The next letter floats above the line. By the end of the row, the size has changed again.
Before asking your child to write another page, give them a clearer model to follow.
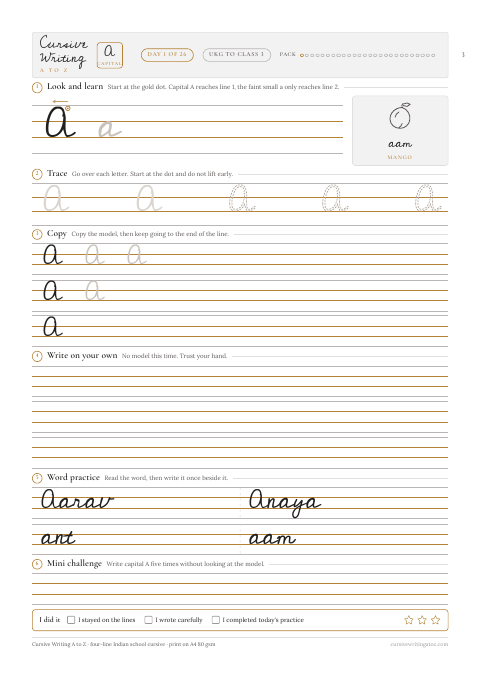
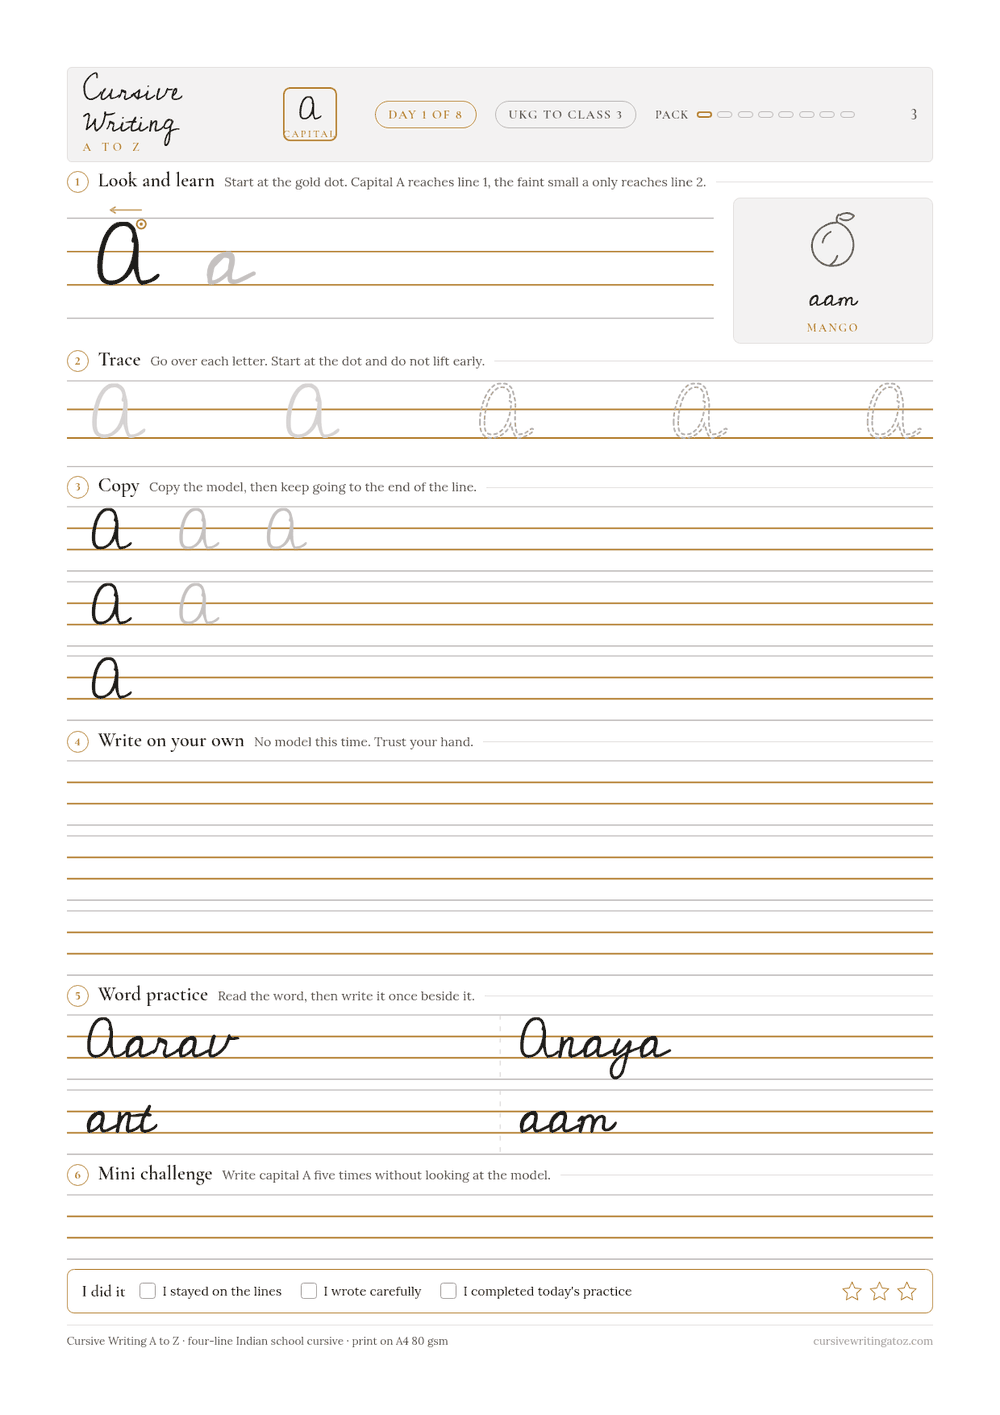
The Cursive Writing A to Z book brings capital and small letters together on Indian four-line ruling. Your child can look at the model, trace, copy and then practise writing on the lines.
You can point to the exact difference instead of repeating "write neatly".
Get both alphabets in a 55-page printable PDF for Rs 149.
Print the letter that needs attention today. Keep the complete A to Z ready for the schoolwork that comes next.
Complete the order form, receive a UPI request and pay by UPI. Your 55-page PDF is emailed after payment. Printing is separate.
The problem may not be remembering the alphabet
Ask your child, "Which letter is this?"
"B," they answer immediately.
Now ask them to write B and b in the school notebook.
The capital may be too short. The small letter may be too wide. Its tall part may stop halfway up, while the body takes up more space than it should.
Your child knows the letter. Placing it on the four lines is another skill.
They are trying to remember the shape, control the pencil, choose a starting point and keep the size steady. All this while checking whether you are happy with the last attempt.
"Concentrate" does not tell them which part to change.
"Keep this small body between these two lines" does.
That is the practical reason to use this book: it gives you a printed reference and a place to practise the same correction.
Not a fresh page with the same uncertain instruction.
Does this happen at your study table?
The school bag is still open. The tiffin needs washing. Reading homework is waiting.
You sit down for what should be one quick handwriting line.
The first letter looks all right. You rub out the second. Your child presses harder on the third. Then you notice that the whole row is getting bigger.
"See the line."
"I am seeing."
"Then why are you writing like this?"
Neither of you planned to have this conversation again.
The difficulty is that you can see several things wrong at once. Your child may not know which one you mean.
Is the shape wrong? Is it too big? Is it sitting too high? Is the tail in the wrong place?
The A to Z book helps you narrow the task.
Put the printed sheet beside your child. Choose one form. Point to one feature. Ask for a few attempts with that feature in mind.
For those few minutes, the job is not "make your handwriting good".
It is something your child can check:
"Does the bottom of this small letter touch line 3?"
What this file actually is
The A to Z pair is a 55-page printable PDF covering capital and small cursive letters.
It is not a physical book sent by courier. You receive the file by email after payment and print the sheets you want to use.
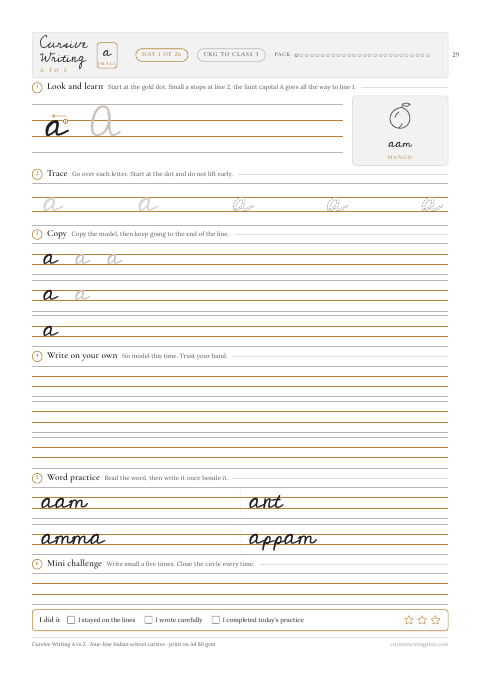
The book includes both forms together on each letter sheet, with one full A4 sheet for each letter. Your child can compare the capital and small form without moving between two separate books.
The practice approach is straightforward:
- Look at the model. Notice the shape and where it sits.
- Trace the letter. Follow the printed form.
- Copy it. Keep the model nearby while making an attempt.
- Write on the four lines. Check the result against the model.
You get the complete capital and small alphabets, not only the letters being taught this week.
That matters when the teacher moves ahead, or when a letter from last month starts causing trouble again.
You already have the relevant sheet. Print it, return to the model and work on the specific difficulty.
Rs 149 is a one-time payment. There is no subscription.

The four lines do more than keep the page tidy
"Make it smaller" can be a confusing correction.
How much smaller? Should the whole letter shrink? What happens to the tall part or the tail?
Indian four-line ruling gives you fixed places to point to.
Every practice sheet in this book uses four-line Indian ruling only.
Here is the basic placement used in the book:
| Letter part | Where it belongs |
|---|---|
| Small bodies, as in a, c, e and o | Between lines 2 and 3 |
| Tall parts, as in b, d, h, k, l and t | Reaching line 1 |
| Tails, as in g, j, p, q and y | Going down to line 4 |
| Capital letters | Extending from line 1 to line 3 |
Instead of saying "too big" about the whole letter, you can separate the parts.
"The body stays here. Only the tall part goes up."
Or:
"The body stays the same size. The tail goes below it."
Take small a.
If its body grows into the space above line 2, your child may not need another explanation of the whole alphabet. They need to see the space that belongs to a.
Point to lines 2 and 3. Compare the printed model with one attempt. Ask for two more letters inside that space.
You now have a clear practice task and a clear thing to check.
Why both capital and small letters belong in the same book
A child can write a recognisable capital letter and still struggle with the small form.
Sometimes both forms become the same height. Sometimes the small letter is treated as a tiny copy of the capital, even when the shapes are different.
Seeing the forms together gives you a useful comparison.
"Look at the capital A. Now look at small a. Which one reaches the top line?"
Your child does not have to practise both forms in the same sitting. If the school is working on capitals today, practise capitals.
But the small form is there when you need it.
For a Class 1 child moving between both alphabets, that means less switching between materials. For a Class 2 or Class 3 child revising uneven letters, it means you can return to the exact form that is causing trouble.
You are buying both alphabets once, rather than choosing one now and needing the other later.
The A to Z pair focuses on letter forms. Dedicated joining practice is available separately when connecting letters becomes the main task.
You do not need to print 55 pages before you begin
The file is complete. Your first printing need not be.
Open the PDF and choose the letter being taught in school, or the one that repeatedly receives a correction.
Print that sheet and begin there.
If your child needs another attempt next week, print the sheet again. If one form is already steady, spend your practice time on the form that is not.
This is one practical advantage of a printable book: you can return to the same model without buying another copy of the whole book.
At the xerox shop, ask for A4 printing at 100 per cent scale, not fit to page. The sheets work in black and white.
A small selection may cost Rs 20 to Rs 30, depending on the shop and number of sheets. That is not the printing price for the complete 55-page file. Check the local rate before printing or binding the whole book.
The Rs 149 price is for the PDF. Printing and binding are separate.
What a week of ten-minute practice can look like
You do not have to cover A on Monday, B on Tuesday and finish the alphabet as quickly as possible.
If small a is still becoming too tall, moving to five new letters may leave the original problem untouched.
Choose one letter. Give each short session a slightly different job.
The routine below is a suggestion for using the book, not a promise of a handwriting change in seven days.
| Day | The job for about ten minutes |
|---|---|
| Monday | Look at the capital and small form together. Point to their top and bottom lines. Trace a few examples slowly. |
| Tuesday | Return to the same letter. Copy a few examples. Check line placement before adding more. |
| Wednesday | Make a few attempts without looking at the model each time. Compare them with the printed form. |
| Thursday | Work on the harder form. Choose one correction, such as keeping the small body below line 2. |
| Friday | Find the familiar letter in a short word from schoolwork. Notice whether its size changes when other letters are beside it. |
| Saturday | Compare an earlier attempt with a later one. Ask your child to point out a letter that sits correctly. |
| Sunday | Revise briefly or take a break. Decide whether the same letter needs another week or whether to move on. |
Within each session, keep the task small.
Spend a little time looking. Do a few attempts. Pause to compare. Let your child make the next attempt using the correction.
Ten minutes is a useful limit, not something to complete through tears.
If your child is tired, stop earlier. You can return to the sheet tomorrow. There is no need to turn one difficult row into an entire evening.
- Order the PDF and print a selected sheet. Complete the order form, pay the UPI request and receive the file by email after payment. Print the A4 sheet you need at 100 per cent scale, not fit to page.
- Choose one letter and one thing to check. Use the school notebook as your guide. Before your child writes, point to the model and explain the specific correction, such as where the small body should sit.
- Look, trace, copy and then write independently. Move through the practice with a few attentive attempts. Compare with the model, stop before the session becomes tiring and revisit the letter when needed.
What should you say while your child practises?
You do not need a long handwriting lesson prepared in advance.
The printed model gives you something to refer to. Keep your instruction tied to what your child can see.
Instead of "This whole row is wrong," say:
"Let us check where these letters are sitting."
Instead of "Make everything smaller," say:
"Keep the small body between these two lines."
Instead of "Write ten more," say:
"Write two more, then we will compare."
And when one attempt is placed correctly, name what is correct:
"This one touches the line and stays the right height."
That is more specific than praising or correcting the whole page.
The book supplies the model and the practice space. Your role is to help your child notice one useful difference at a time.
Where should a UKG, Class 1, Class 2 or Class 3 child begin?
Start with what the school is teaching and what your child can currently manage.
The class label is a guide, not a reason to rush.
| Class | A useful starting point | What to avoid rushing |
|---|---|---|
| UKG | Suitable tracing and a few letter attempts, if pencil control is ready | Filling a whole page or writing independently too soon |
| Class 1 | Capital and small forms alongside current schoolwork | Practising too many unfamiliar forms in one sitting |
| Class 2 | Revising letters with uneven bodies, tall parts or tails | Adding speed while placement is still uncertain |
| Class 3 | Returning to forms that become unclear inside words | Assuming alphabet revision is unnecessary because the child knows A to Z |
For a younger child, a few careful attempts may be enough.
If holding and moving the pencil is still difficult, begin with lines, curves and loops on four-line notebook before expecting independent letter writing.
For an older child, you need not go back through every letter. Open the school notebook and choose the form that repeatedly loses its shape or changes size.
If individual letters are already steady but joining is the difficulty, the separate joining pack is the more relevant next step.
Both alphabets cost Rs 149 together
Here is the choice clearly:
| Book | Pages | Price |
|---|---|---|
| Capitals only | 29 | Rs 99 |
| Small letters only | 29 | Rs 99 |
| A to Z capital and small pair | 55 | Rs 149 |
Buying the two individual books costs Rs 198.
The A to Z pair costs Rs 149, saving Rs 49, with capital and small forms together on the letter sheets.
If your child needs practice with both alphabets, the pair gives you both for less than buying them separately.
You get the complete PDF now. You decide which pages to print and when to use them.
Order both alphabets in one 55-page PDF. Complete the form, pay the UPI request and receive your book by email after payment.
Planning for more than alphabet practice? See all packs and prices. The full bundle is Rs 399, compared with Rs 1,073 bought separately.
But you do not have to plan every later stage today.
If the current red remark is about individual letter size and placement, the A to Z book gives you a focused place to begin.
How to order your book
The order process today is order form, UPI request, PDF by email.
1. Complete the order form
Go to the order form and order the A to Z capital and small pair, Rs 149.
Check your email address carefully. That is where your PDF will be sent.
2. Pay the UPI request
You will receive a UPI request for payment.
Card checkout is not available today. PayU is coming through this site's own merchant account, but it is not live yet.
3. Receive the PDF by email after payment
Download your book and choose the first sheet to print.
You can print at home or take the file to a local xerox shop. There is no courier delivery because this is a digital book.
For order help, email [email protected].
A few details worth knowing before you order
Page updated 2026-09-05.